Here's the long-form blog article:Is Your Pantry a Black Hole? Conquer the Chaos with Dollar Store Finds!
Let's be honest, how many times have you stared into your pantry, completely overwhelmed? You know there's food in there somewhere, but finding it feels like an archaeological dig. Half-eaten bags of chips mysteriously appear, forgotten spices gather dust, and you’re pretty sure a can of diced tomatoes has been lurking in the back for approximately three years. You’re not alone!
A cluttered pantry isn't just visually unappealing; it leads to food waste (buying duplicates of things you already have but can't find!), mealtime stress, and ultimately, wasted money. But before you resign yourself to a lifetime of pantry pandemonium, hear this: youcanbring order to the chaos, and you don't need to spend a fortune to do it. In fact, you can transform your pantry using amazing and affordable finds from your local dollar store!
That’s right. The dollar store. Often overlooked as a hub for flimsy toys and questionable snacks, it’s actually a goldmine for budget-friendly organizing solutions. I'm talking bins, baskets, shelf liners, spice racks…the whole shebang! I’ve personally overhauled my own pantry using almost exclusively dollar store items, and the difference it's made in my daily life is HUGE. No more mystery ingredients, no more wasted food, and a whole lot less stress when it comes to putting dinner on the table. Let's dive into howyoucan achieve the same results!
Planning Your Pantry Makeover: It All Starts with a Strategy
Before you rush off to your nearest dollar store, grabbing every bin in sight (tempting, I know!), take a moment to plan. A little bit of preparation will save you time, money, and a whole lot of frustration in the long run. Think of it like creating a roadmap for your pantry’s transformation.
Step 1: The Great Pantry Purge
This is arguably the least glamorous, but most essential step. Pulleverythingout of your pantry. Yes, everything. Place it all on your kitchen counter, table, or any available surface. This allows you to see exactly what you have and what you don't.
Now, the hard part: be honest with yourself. Check expiration dates. Toss anything that's expired, stale, or you know you'll never use. If you’re unsure about something, ask yourself these questions: "When was the last time I used this?" "Do I have any plans to use this in the near future?" "Is the packaging damaged, or is the food past its prime?"
Don't be afraid to be ruthless! The less you have to organize, the easier the whole process will be.
Step 2: Assess Your Space
With your pantry completely empty, take a good look at the available space. Measure the shelves, both width and depth. Consider the height between shelves as well. Note any awkward corners or unusual features. This information is crucial when you start choosing containers and organizers.
Think about how you use your pantry. What items do you access most frequently? Which items tend to get lost in the shuffle? Consider your family's habits and needs. For example, if you have young children, you might want to dedicate a lower shelf to their snacks.
Step 3: Make a Shopping List
Now that you know what you need to store and how much space you have, it's time to create a shopping list. This will help you stay focused at the dollar store and avoid impulse buys.
Think about the different categories of food in your pantry:
Canned goods
Snacks
Spices
Baking supplies
Pasta and grains
Breakfast items
Consider what types of containers would work best for each category. For example, clear plastic bins are great for snacks and canned goods, while airtight containers are ideal for flour, sugar, and other baking staples. Don't forget about shelf liners to protect your shelves from spills and crumbs.
Also, consider what type of aesthetic you are going for. Matching containers will give your pantry a cohesive look, but mismatched containers can also work if you embrace a more eclectic style.
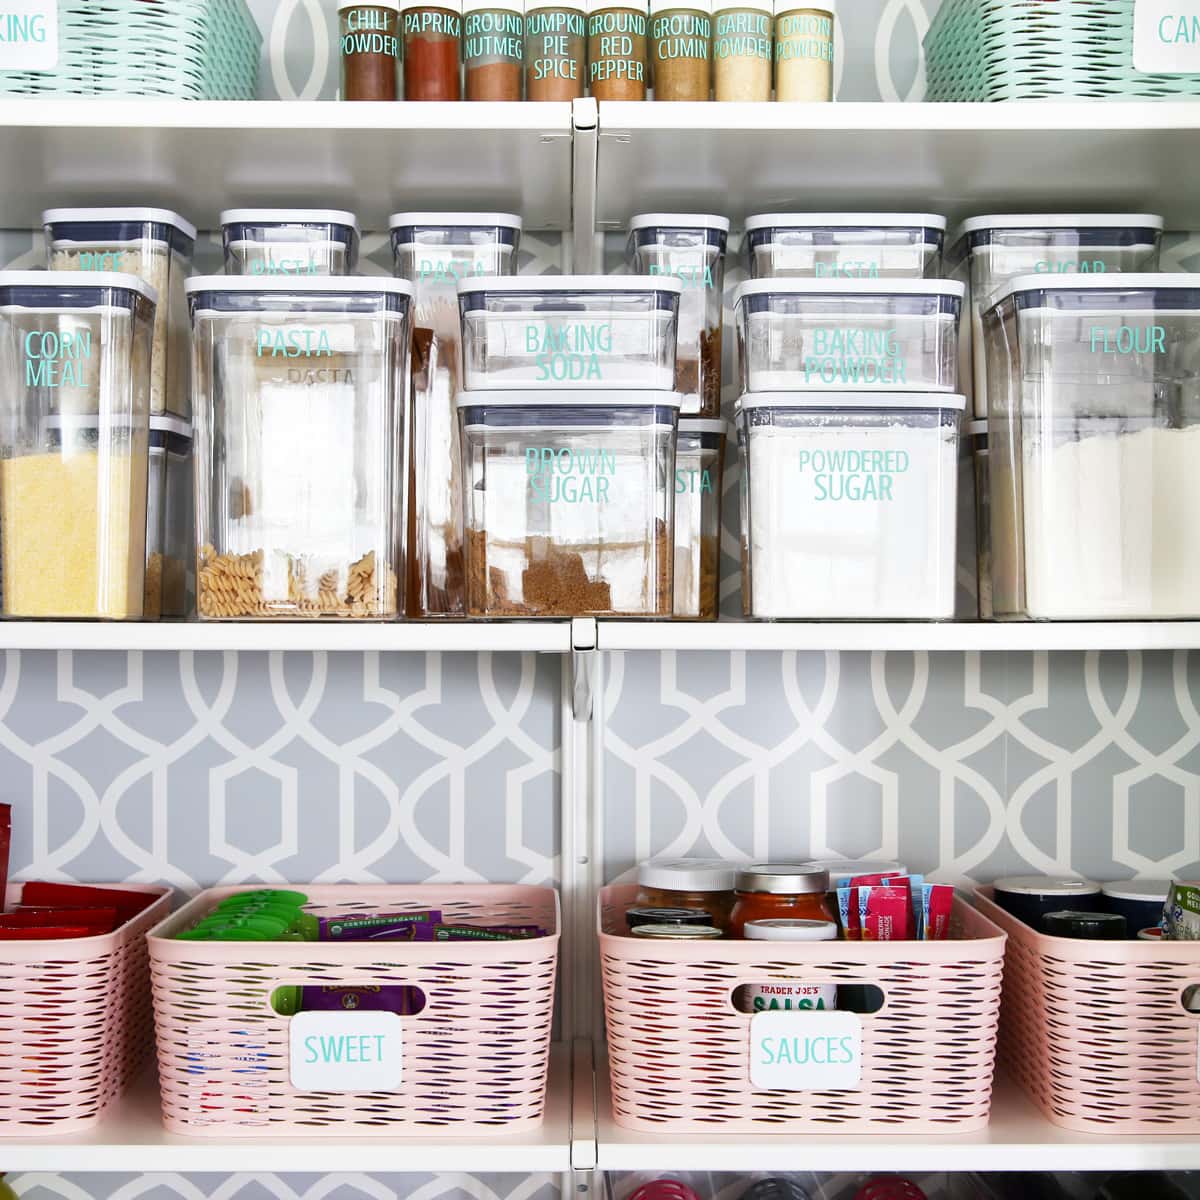
Dollar Store Organizing All-Stars: Products That Work Wonders
Now, let's talk about the specific dollar store finds that can transform your pantry from a disaster zone to an organized oasis. Keep in mind that product availability can vary depending on your local store, but these are some general categories to look for:
Bins and Baskets: Your Pantry's Best Friends
Dollar stores are packed with plastic bins and woven baskets in various sizes and shapes. These are perfect for grouping similar items together and keeping shelves tidy.
Clear Plastic Bins: These are ideal for storing snacks, canned goods, and other pantry staples. The clear plastic allows you to easily see what's inside, so you can avoid buying duplicates. I use these for everything from granola bars to canned vegetables.
Woven Baskets: These add a touch of warmth and texture to your pantry. They're great for storing items like potatoes, onions, and garlic, or even for holding extra paper towels or cleaning supplies.
Smaller Bins: Keep your smaller bagged items like nuts or dried fruit contained by placing them in a smaller bin.
Shelf Liners: Protection and Style
Shelf liners are a simple but effective way to protect your pantry shelves from spills, crumbs, and scratches. They also add a touch of style to your pantry.
Non-Adhesive Shelf Liners: These are easy to install and remove, making them a great option for renters or anyone who likes to change things up.
Adhesive Shelf Liners: These provide a more permanent solution and are ideal for shelves that tend to get a lot of wear and tear.
Spice Racks and Risers: Taming the Spice Cabinet
Spices can be a real headache to organize. They often end up scattered around the pantry, taking up valuable space. Dollar stores offer a variety of spice racks and risers that can help you keep your spices neat and accessible.
Tiered Spice Racks: These allow you to see all of your spices at a glance, so you can quickly find what you need.
Spice Jars: While you may not find the glass kind, some dollar stores have small plastic jars that you can use to decant spices.
Food Storage Containers: Keeping Food Fresh
Airtight food storage containers are essential for keeping flour, sugar, pasta, and other dry goods fresh. Dollar stores often have a selection of plastic containers in various sizes.
Square or Rectangular Containers: These are more space-efficient than round containers and can be easily stacked.
Containers with Lids: These help to keep food fresh and prevent spills.
Label Maker or Stickers: The Finishing Touch
Once you've organized your pantry, don't forget to label everything! This will help you and your family stay organized and make it easy to find what you need.
Label Maker: If you want a professional-looking pantry, a label maker is a great investment.
Stickers and Markers: These are a more affordable option and can be just as effective. Just make sure to use a permanent marker that won't smudge.
Putting It All Together: The Step-by-Step Guide
Okay, you've got your plan, you've gathered your supplies, now it's time to get to work! Here's a step-by-step guide to help you organize your pantry using dollar store finds:
1.Clean Your Shelves: Before you start putting anything back in your pantry, give the shelves a good cleaning. Wipe them down with a damp cloth and mild soap, then dry them thoroughly.
2.Install Shelf Liners: Cut the shelf liners to the appropriate size and install them on your shelves.
3.Group Similar Items Together: Group your food items by category (e.g., canned goods, snacks, spices, etc.).
4.Choose the Right Containers: Select the appropriate containers for each category of food. Use clear plastic bins for snacks and canned goods, airtight containers for flour and sugar, and spice racks for spices.
5.Arrange Your Pantry: Arrange your pantry shelves in a way that makes sense for you and your family. Place frequently used items within easy reach, and store less frequently used items on higher or lower shelves.
6.Label Everything: Label all of your containers and shelves so you know exactly where everything goes.
7.Maintain Your Pantry: Once you've organized your pantry, it's important to maintain it. Make it a habit to put things back where they belong after you use them. Regularly check expiration dates and toss any expired food.
People Also Ask: Quick Pantry Organizing FAQs
How do I deal with awkward corners in my pantry?*Use corner shelves or Lazy Susans to maximize space in awkward corners. Dollar stores often have small turntables that work well.
What if my pantry shelves are wire? Line wire shelves with cardboard or foam board before adding shelf liners to create a more stable surface. This prevents items from falling through the gaps.
How do I keep my pantry from getting cluttered again? Regularly purge expired items and put things back in their designated spots after each use. Involve the whole family in the process!
Can I really organize my entire pantry with just dollar store items? Absolutely! With a little creativity and planning, you can transform your pantry on a budget.
The Sweet Taste of Organization
Organizing your pantry might seem daunting, but with a little planning and the help of some budget-friendly finds from your local dollar store, you can create a space that's both functional and visually appealing. The benefits of an organized pantry extend far beyond aesthetics. It saves you time, reduces food waste, and helps you feel more in control of your kitchen.
So, take that first step. Even just clearing out a single shelf can make a difference. And remember, creating a functional and beautiful pantry isn’t about perfection; it’s about progress. Start small, celebrate your wins, and enjoy the sweet taste of an organized pantry! Go get those dollar store bins!